Measuring
Measuring Body Jewellery. We use industry standards to measure all our items of body jewellery that we make to ensure that you get accurately sized jewellery that is perfectly fitting, comfortable to wear and lasts a life time every time you order. Please check the sections below to see how each of the styles of jewellery are measured.
Labrets
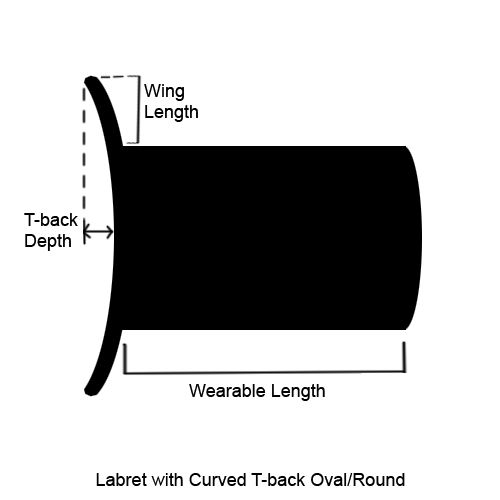
Measuring Labrets:
-Size: this is the size in millimetres (or gauge) of the jewellery.
To measure this on round pieces you place the calipers at either edge of the stem of the labret, near the top of the wings. If it is a flared labret you measure at the smallest point. Measure from several points to get a more accurate reading.
For information on how to measure non-round jewellery (such as ovals) please see the section below.
-Wearable length: this is the length of the stem of the labret (the piece that sits inside the piercing). By using this measurement instead of total length it ensures you always have the correct size jewellery.
To measure this you place one side of the caliper on top the wing where it begins to round into the stem, and the other side at the tip of the labret where it begins to round into the front face.
If you have requested an o-ring it is the space between the top of the wing and the inside of the o-ring. Russell adds 2mm as standard to allow space for the o-ring and a small lip. For example, if you order a 10mm wearable with an o-ring, when you remove the o-ring the wearable would be 12mm, but with the o-ring in place the space between the top of the wing and the o-ring would be 10mm.
-Total length: this is the length of the labret, from the very front of the face (including dome if there is one) to the very tip of the wings on the back. The reason we don't use this measurement is that dome sizes, t-back depth, material, and the item being handmade means the wearable length would be different on every piece.
To measure take the caliper and place one side in the middle of the front face and the other side in the middle of the back face.
-T-Back Depth: this is the amount of curve on the t-back. Some people find having a more severe or more shallow curve allows the piece to sit better and avoid damaging their teeth.
To measure take something flat and solid, like a metal ruler, and place the flat side against the tips of the wings, then take your caliper and measure the gap between the ruler and the deepest part of the curve.
If you are unsure of what this measurement should be select 'standard depth' from the drop down list on the product page, as this that will result in a piece made to a standard depth for the size ordered which fits most people ok. If you are stretching up and measuring your old piece you will need to adjust the depth slightly for the larger wing span to keep the curve the same shape, if you need help with this please contact us to discuss your needs.
-Wing length: this is the length of the wing on each side of the labret.
To measure place one side of the caliper against the stem of the labret and the other at the very tip of the wing keeping the calipers at a right angle from the stem.. Measure from both sides to get a more accurate reading.
-Flare size: this is how much bigger the flare is than the size of the labret. As standard Russell makes labrets with no flare, but if you wish to have a flared labret please contact us for more information.
To measure first get the size measurement by following the above instructions, then measure the front face from edge to edge. The difference between these two measurements is the flare size. For example, if you have a 6mm plug and the front face is 7mm the flare size is 1mm.
Labret Oval Shapes:
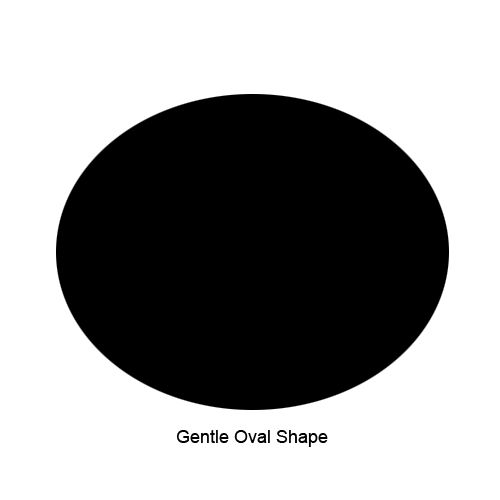
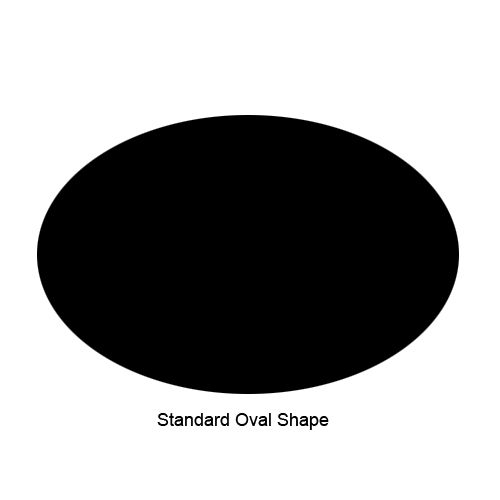
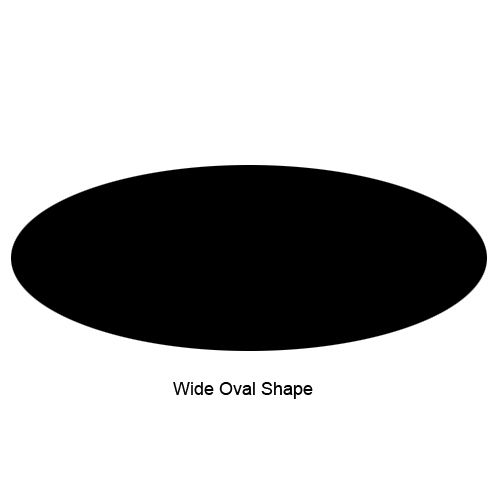
We offer three different styles of oval shape;
-Gentle oval is nearly round, it's a good place to start if you have never worn an oval before, it's also good for those at larger sizes who like the look of a round piece but are finding it is distoring the lip too much.
-Standard oval is the most common oval ordered.
-Wide oval is a lot wider with not much height, it stops lip distortion but some people find they need to work into this shape to avoid discomfort at the edges.
Measuring Non-Round Jewellery
How to measure oval labrets and any non-round jewellery (also works on round jewellery). We often have people measuring oval labrets incorrectly, so we have made this section to help people understand how to measure their jewellery to ensure they get the correct size every time.
This is how to measure the circumference, which is how we measure all our non-round pieces; this is the only way to get the correct sizse piece so please make sure you use this method to order your jewellery.
(Photos coming soon)
1. You will need; paper, scissors, pen or pencil, calipers (or ruler with millimetre increments if you don't have calipers) and a calculator.
2. Cut a thin strip of paper, approximately 3mm wide.
3, Wrap the paper around the piece of jewellery on the wearable point (please see diagrams in other sections if you are unsure of where the wearable is)
4. Mark the paper where the paper touches the end and makes a loop.
5. Lay the strip of paper flat and using you calipers measure from the end of the paper up to the line (please be aware with a ruler this will be less accurate)
6. Put that number into the calulator and divde by 3.14 (pi)
The number you get is the circumference, and this is the size you can order.
Example, I have measured the strip of paper and the number I have is 31.4mm, when I divide this by 3.14 I get 10, so the size I will order is 10mm.
Plugs / Eyelets
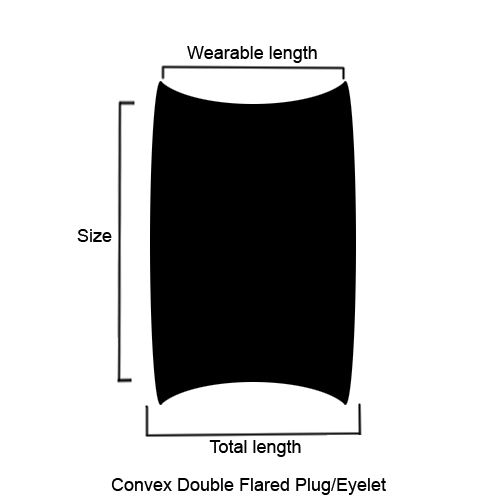
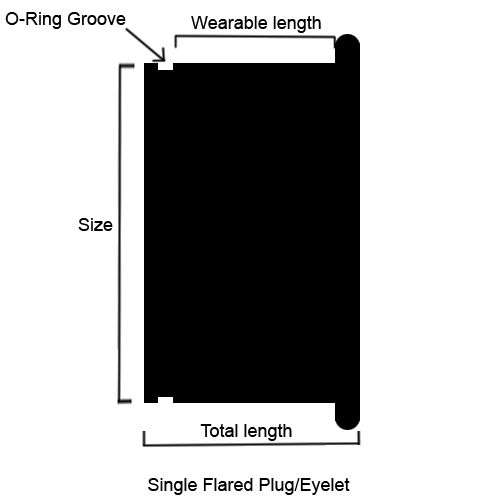
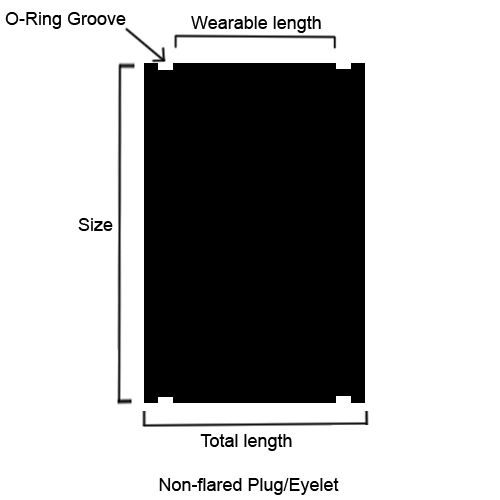
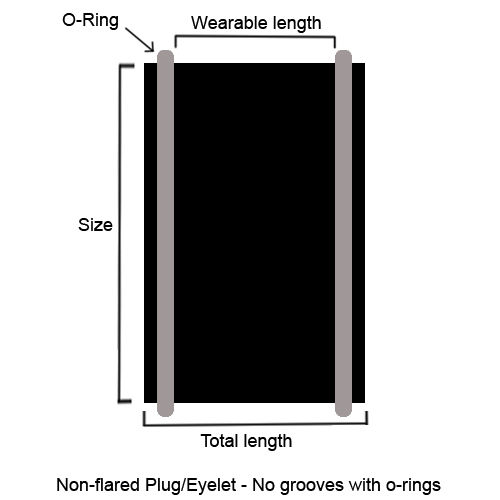
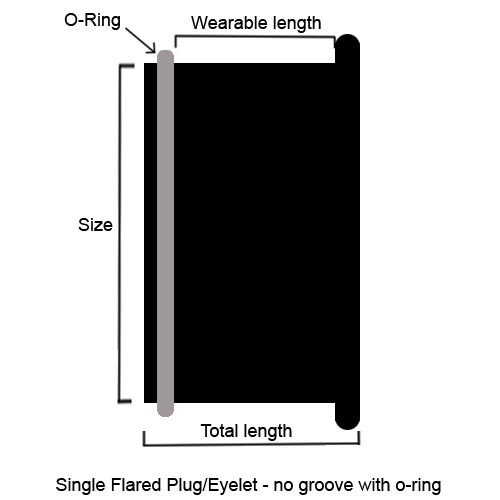
Measuring Plugs, Tunnels, or Eyelets;
-Size: this is the size in millimetres (or gauge) of the jewellery.
To measure this on round pieces you place the calipers at either edge of the plug, if it is a flared plug you measure at the smallest mid point of the werable length. Measure from several sides to get a more accurate reading.
For information on how to measure non-round jewellery please see the section above.
-Wearable length: this is the length of the of edge of the plug that sits inside the ear. By using this measurement instead of total length it ensures you always have the correct size jewellery.
To measure this on double flared plugs take the calipers and measure from just on the inside edges of the flare tips.
On single flared or non-flared plugs with o-ring grooves it is the space between the o-rings grooves. Place the caliper just inside the groove on both sides.
If you have requested o-rings and no grooves Russell adds 2mm as standard that will give space for the o-ring and a small lip in front; for example if you have ordered a 10mm non-flared plug with o-rings and no grooves, when you remove the o-rings and measure the wearable it would be 14mm, but with the o-rings in place the space between the o-rings would be 10mm.
-Total length: this is the length of the entire plug, from the very front of the face (including dome) to the very back of the plug. The reason we don't use this measurement is that dome sizes, material, and the item being handmade means the wearable length would be different on every piece.
To measure take the caliper and place one side in the middle of the front face and the other side in the middle of the back face.
-Flare size: this is how much bigger the flare is than the size of the plug.
To measure first get the size measurement by following the above instructions, then measure the front face from edge to edge. The difference is the flare size. For example, if you have a 10mm plug and the front face is 12mm in diameter the flare size is 2mm.
-Flare type: as standard Russell offers double flared, singled flared with o-ring groove and without, and non-flared with o-ring groove and without.
Septum Jewellery
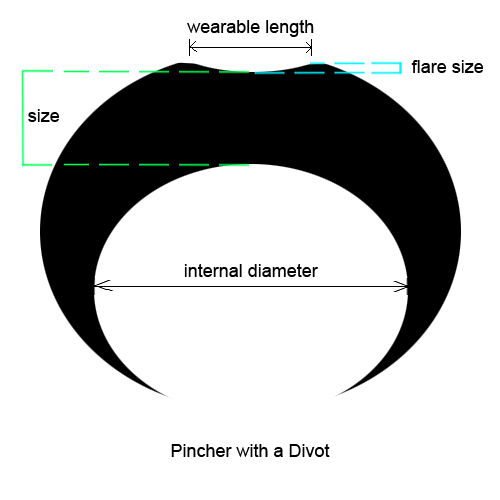
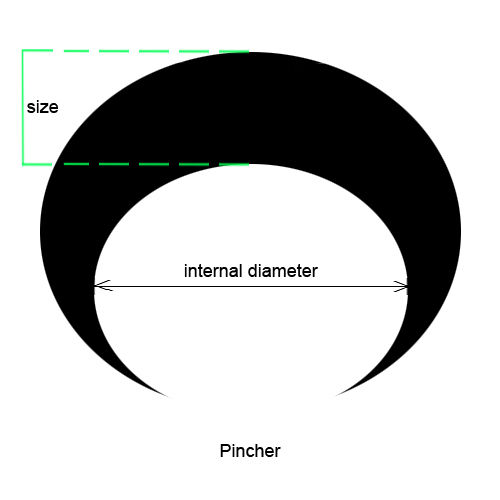
Measuring Septum Pinchers:
-Size: this is the size in millimetres (or gauge) of the jewellery.
To measure this on round pieces you place the calipers at either edge of the part of the part of the pincher which sits inside the piercing, if it is a flared pincher you measure at the smallest point. Measure from several sides to get a more accurate reading.
For information on how to measure non-round jewellery please see the section above.
-Wearable length: this is the length of the part that sits inside the piercing.
To measure this on a piece of jewellery, measure the size continuing around the pincher until you are 0.5mm smaller than the size of the piece, that is the end of the wearable on that side, then do the same on the other side. Then take the calipers and measure the distance between each point.
On a flared piece, you measure from each side of the flare when it starts to round into the full size.
Too measure without jewellery, take the calipers and measure your septum in a mirror, don't pinch it tight and allow 1-2mm each side for comfort.
-Divot (Flare) size: this is how much bigger the divot is than the size of the pincher.
To measure first get the size measurement by following the above instructions, then measure the size just after the divot . The difference is the divot size. For example, if you have a 4mm pincher and the size just after the flare of the divot is 5mm the divot size is 1mm.
-Internal Diameter: this is the space inside the pincher.
To measure, place one side of the caliper inside the right side of the pincher, and the other side of the caliper inside the left side of the pincher.
Ear Weights
Ear weights are a special case when it comes to sizing them. The important thing to note here is the 'minimum size to wear' as you will need to be stretched to this size or larger to be able to insert the weights. We always state the minimum wearable size, weight per piece, and dimensions of the piece (height, width and thickness). For those that are new to ear weights, we recommend starting off with light weight pieces in the 10-20 gram range before moving on to heavier weights, some training of your ear lobes is required to be able to comfortably wear heavy weights for any period of time. You may also find wearing them through silicone eyelets such as Kaos Softwear will help distribute the weight a more evenly over the lobe. To help avoid thinning of the ear lobe you should restrict the amount of time you wear weights for, around 2-3 hours is usually recommended and ensuring that you have jewellery on hand to change to if out and about. Lastly never stretch using weights! You'll stretch the piercing unevenly and could form a thin spot.